Absolute stress in structural steel members plays an important role in design and analysis of steel structures. Non-destructive measurement of absolute stress in steel members can provide useful information to optimize the design of structures and allow the safety of existing structures to be evaluated[1]. One of the promising directions of all non-destructive methods for absolute stresse measurement is the application of ultrasound[2]. Ultrasonic stress measurement is based on the acoustoelastic effect[3], i.e., in the elastic range, the velocity of ultrasound linearly varies with material stress when a wave propagates in the material. Compared with other methods, ultrasonic stress measurement method has advantages in both cost and flexibility[4]. This makes ultrasonic method one of the most promising directions in absolute stress non-destructive measurement.
In recent years, the most widely studied ultrasonic stress measurement technique is critically refracted longitudinal (Lcr) wave method[5]. The Lcr wave is a bulk longitudinal wave[6]. It can propagate underneath the steel member surface with a certain penetration depth[7, 8]. It has been studied by Egle and Bray[9, 10] that the Lcr wave exhibits the largest sensitivity to stress among all ultrasonic waves and is least affected by material texture. In addition, the LCR technique neither requires opposite parallel surfaces non imposes any strict geometric limitations on the test specimens[11]. All these features make Lcr waves the best candidate for evaluation of absolute stress[12, 13]. Although certain progress has been achieved in the development of different experimental techniques, methods and devices that investigate the application of ultrasonic methods to measure the absolute stress of steel members remain rare in the literatures[2]. The main reason is that the ultrasonic wave velocity is not very sensitive to stress, i.e., the change of the ultrasonic wave velocity and time-of-flight (TOF) are hard to be measure. For example, a 100 MPa stress change corresponds to a velocity change of less than 1%[14]. In addition, environmental factors[2], such as temperature, noises and roughness of the steel member surface, will lead to a change of the ultrasonic wave form, which will affect the accuracy of the absolute stress measurement. Apart from environmental factors, ultrasonic propagation characteristics are also influenced by some factors such as grain size[15], material texture[16], and coupling conditions[17], all of which will exert more influence on the change of ultrasonic propagation velocity than absolute stress.
Realizing the defects of velocity and TOF measurement methods, some scholars proposed the use of ultrasonic power spectrum to measure absolute stress, which is based on the birefringence of shear waves[18]. One advantage of this method is that it is less affected by environmental noise[18, 19]. Blinka and Sachse[19] investigated the interference between two decomposed shear waves in stressed aluminium and found the echo power spectrum exhibited periodic stress-induced minima, which laid the foundation for stress measurement using ultrasonic power spectrum method. In recent years, there is no new research works in the field of absolute stress evaluation using ultrasonic shear-wave spectroscopy. In fact, ultrasonic stress measurement using the shear-wave spectroscopy has not formed a mature method. In general, stress measurement using shear-wave spectroscopy requires further investigation.
In this paper, a non-destructive evaluation approach to measure the absolute stress of steel members using ultrasonic shear-wave spectroscopy is proposed. A formula is derived for steel member absolute stress measurement based on ultrasonic shear-wave birefringence and acoustoelasticity theory. Two steel members made of Q235 steel are employed to investigate the relationship between the stress and the frequency corresponding to the minimum value in shear-wave echo amplitude spectrum. On this basis, the absolute stress of steel member loaded by a test machine is measured by the proposed method and the results are validated.
1 Stress Measurement Theory in Shear-Wave SpectroscopyIn a free state, the velocity of ultrasonic shear waves in an acoustically isotropic metallic material is independent of the directions of propagation and polarization. When a metallic material is subjected to stress, the stress causes acoustic anisotropy of the material. When a beam of shear waves travels from one medium to another, it separates into two shear-wave modes. Shear waves whose polarization directions are parallel and perpendicular to the stress direction have different velocities [20]. This phenomenon is known as birefringence, and is particular to shear waves.
The two separated wave components propagate simultaneously with different velocities and produce interference effects. The shear-wave pulse-echo amplitude spectrum exhibits a periodic minimum value that is sensitive to stress. The periodicity in the pulse-echo amplitude spectrum has an inverse relation with the difference of arrival time between the two separated wave components and the relative difference of velocities is approximately proportional to stress[21].
Therefore, the frequency corresponding to the minimum value in shear-wave echo amplitude spectrum inversely varies with the stress and this relationship has potential to be used to indicate the stress in the material. For the sake of illustration, compressive stress of the steel members is positive and tensile stress is negative. The relationship between the frequency and the stress is expressed by[19]
| $ \sigma = \frac{\kappa }{{f_1^*}}-\gamma $ | (1) |
where σ is the stress, f1* is defined as the first characteristic frequency (FCF); κ and γ are two parameters containing the information of steel member material and thickness. They are expressed as
| $ \gamma-\frac{{-8{\mu ^2}}}{{4\mu + n}}\alpha $ | (2) |
| $ \kappa = \frac{1}{{4{t_0}}} \cdot \frac{{-8{\mu ^2}}}{{4\mu + n}} $ | (3) |
where μ is the second-order elastic constants; n the third-order elastic constants; α the initial acoustic anisotropy of the steel member; t0 the TOF from the contact surface to the bottom surface of the steel member when it is under free-stress condition.
2 Absolute Stress Measurement System and Method 2.1 Absolute stress measurement systemThe photograph and schematic diagram of the measurement system includes an ultrasonic generator, a shear-wave transceiver probe and an oscilloscope, which is shown in Fig. 1. The ultrasonic generator can transmit pulse signals and shunts them into the shear-wave transceiver probe. The pure shear wave is then generated and propagates in steel member. After being reflected by the rear side of steel member, the shear wave is received by the same probe and transmitted to the ultrasonic generator. The received signal is finally displayed on the oscilloscope. The Fourier analysis is used to study the signal′s amplitude spectrum.

|
Fig. 1 The measurement system |
2.2 Absolute stress measurement method
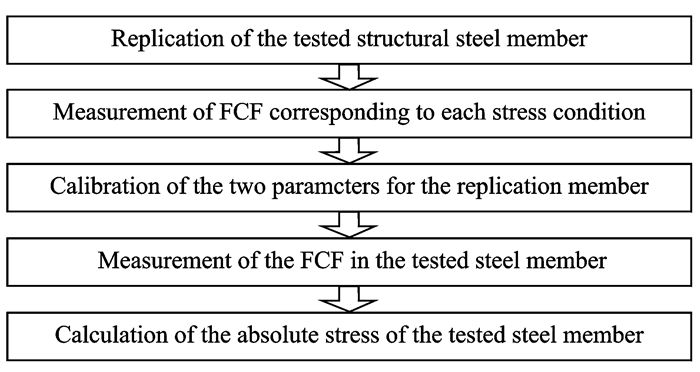
Based on the theory and the absolute stress measurement system, a five-step framework for the measurement of stresses of steel members is proposed. The flowchart is shown in Fig. 2. The detailed process is as follows.
|
Fig. 2 The ultrasonic method |
Step 1 Replication of the tested structural steel member. The tested structural steel members are usually non-removable after installation. Since the calibration of two parameters in Eq. (1) should be performed on the original steel member, a steel member with the same material and thickness to the tested structural steel member should be used as a replication member.
Step 2 Measurement of the FCF corresponding to each stress condition in replication member through the uniaxial test. A group of axial forces (σ1, σ2, …, σn) are imposed on the replication member. The shear-wave echo signals in each corresponding stress conditions are recorded. The first pulse-echo signals are converted into the amplitude spectrum and the FCFs are extracted from the amplitude spectra. Then, the FCF and the corresponding stress value under each load state ((f1-1*, σ1), (f1-2*, σ2), …, (f1-n*, σn)) can be obtained.
Step 3 Calibration of the two parameters for the replication member. This step is the core of the proposed method. The parameters to be calculated are κ and γ in Eq.(1). Based on the data obtained from Step 2, the inverse of FCF and the corresponding stress ((f1-1*, σ1), (f1-2*, σ2), …, (f1-n*, σn)) can be calculated. The relationship between the inverse of FCF and the stress can be fitted using the least squares method. The parameters κ and γ are then calibrated.
Step 4 Measurement of FCF in the tested steel member. The shear-wave transceiver probe is placed on the tested steel member and the echo signal is collected. The first pulse-echo signal is converted into the amplitude spectrum and the FCF of the tested steel member can be extracted from the amplitude spectrum.
Step 5 Calculation of the absolute stress of the tested steel member. The calibrated parameters κ and γ, and the measured FCF are substituted into Eq.(1), and absolute stress of the tested steel member can be determined.
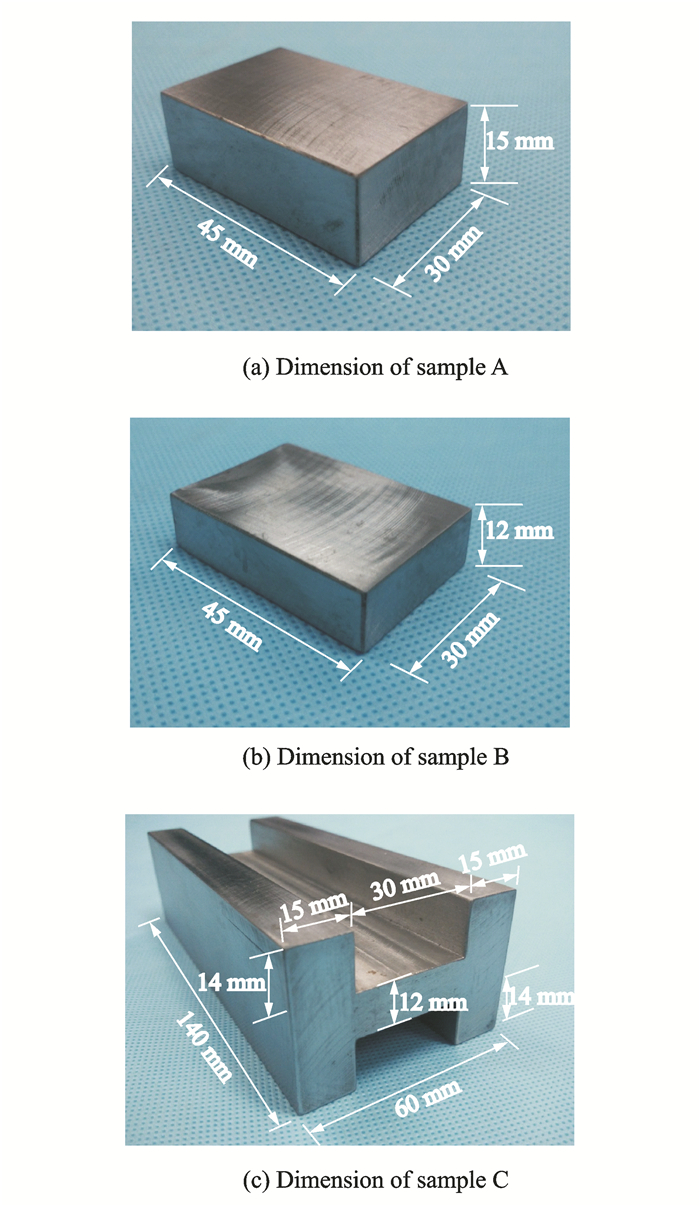
3 Experiment 3.1 Test sampleComponents made of Q235 steel are widely used in engineering structure field, which makes it one of the most important and typical components. Therefore, specimens made of Q235 steel are selected as test objects to study how to evaluate the absolute stress using the proposed method. Two steel blocks, named sample A and sample B, and one H-beam, named sample C, are employed as test specimens. Their dimensions and photographs are shown in Fig. 3, respectively.
|
Fig. 3 Dimension of sample |
3.2 Calibration of the parameters
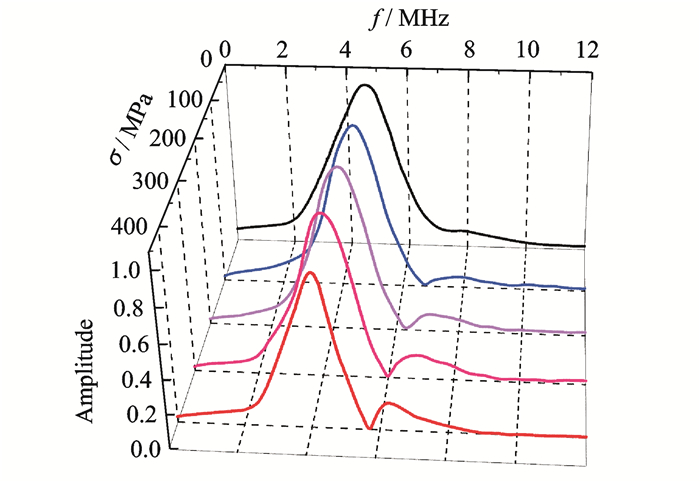
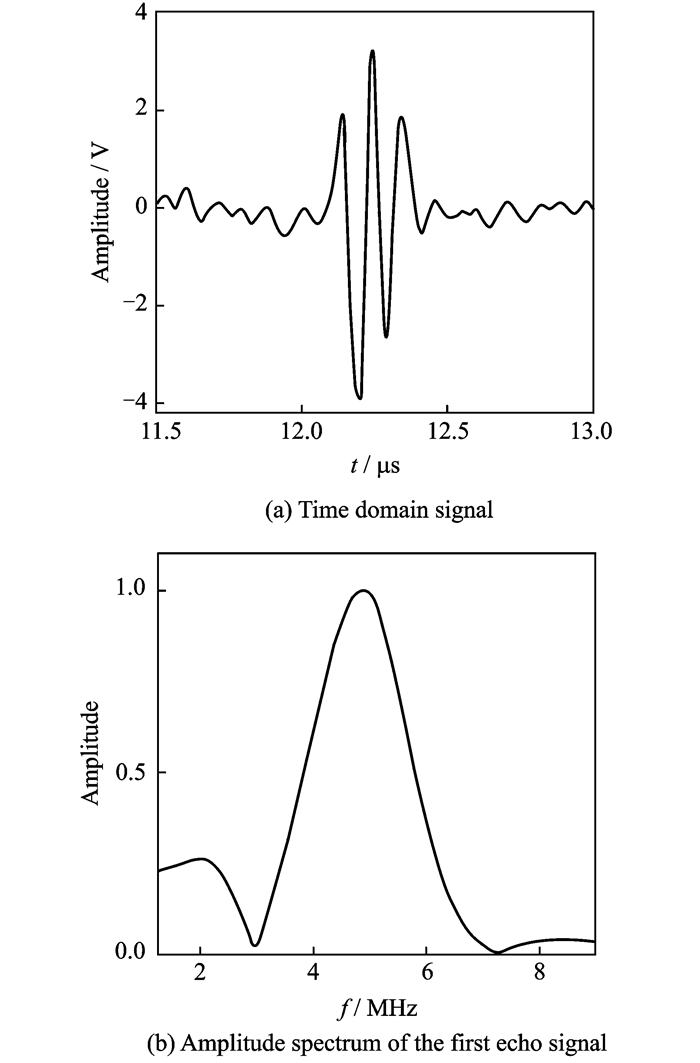
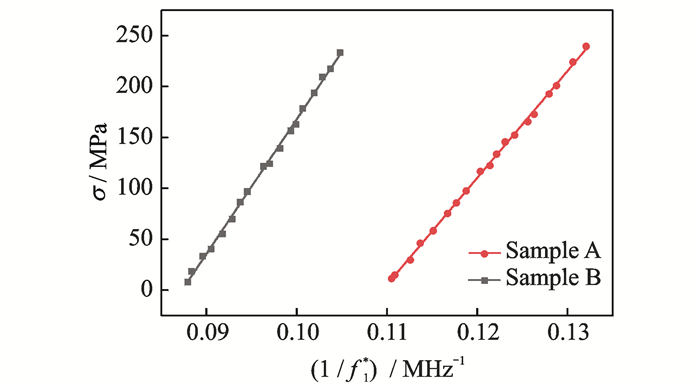
Sample A is employed to investigate the relationship between the stress and the FCF in amplitude spectrum. Fig. 4 shows the shear-wave pulse-echo amplitude spectra variation trend when sample A is under the stress of 0, 100, 200, 300 and 400 MPa, respectively. The loading method is shown in Fig. 1. It can be seen that the FCF in shear-wave echo amplitude spectrum decreases with stress. This accords with the relationship between stress and the FCF in shear-wave echo amplitude spectrum in Eq.(1). Sample A and sample B were employed to obtain the parameters κ and γ by the uniaxial test as showed in Fig. 1. The two specimens were loaded in compression from zero stress, and each load was held for 10 min. Then, the shear-wave echo signals and the corresponding stress data were recorded as illustrated in the second and third step of stress measurement process. The first echo signal of shear wave and corresponding amplitude spectrum were shown in Fig. 5. The FCFs corresponding to the stress values were extracted from the amplitude spectrum. Using the least squares method, linear relationships between the stresses and the inverse of FCFs were fitted, as shown in Fig. 6. The R-square of the fitting for sample A and sample B are 0.999 1 and 0.998 2, respectively, which are both very close to 1 and well demonstrate the ideal linear relationship between the stresses and the inverse of FCFs. Based on these linear relationships, the parameters κ and γ of sample A and sample B were calibrated. The fitting equations of stress measurement for sample A and sample B are obtained as
|
Fig. 4 Amplitude spectra under different stress conditions |
|
Fig. 5 Extraction of time domain signal and first echo signal of shear wave |
|
Fig. 6 Fitting line between stress and the inverse of FCF for Sample A and B |
| $ {\sigma _{\rm{A}}} = \frac{{10\;499.7}}{{f_1^*}}-1\;149.8 $ | (4) |
| $ {\sigma _{\rm{B}}} = \frac{{13\;226.3}}{{f_1^*}}-1\;154.9 $ | (5) |
Based on Eqs.(4), (5) and the calibrated parameters κ and γ, the absolute stress of the tested steel member can be calculated via measurement of the FCF. Sample C loaded by the testing machine was chosen as the tested steel member, because the thickness and material of sample A and flange of sample C is equal, and sample A should be the replication member of the H-beam flange plate. Similarly, sample B is the replication member of the H-beam web plate. Therefore, the calculation of absolute stress in flange and web plate should use the parameters calibrated by sample A and B, respectively.
Under laboratory conditions, a set of random axial loads were applied to sample C in axis direction using the universal testing machine. The first pulse-echo signal was collected and the FCF was extracted from the amplitude spectrum under each loading condition. The applied stress was measured using the proposed method and the measurement results are listed in Table 1.
| Table 1 Comparison between the ultrasonic method and the strain gauge method of sample C |
3.4 Validation of the proposed method
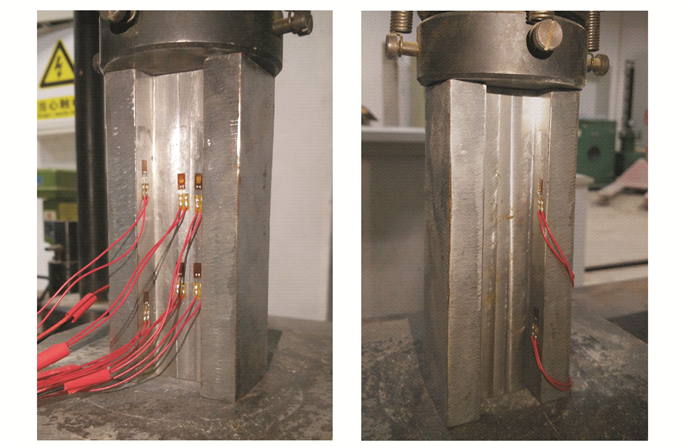
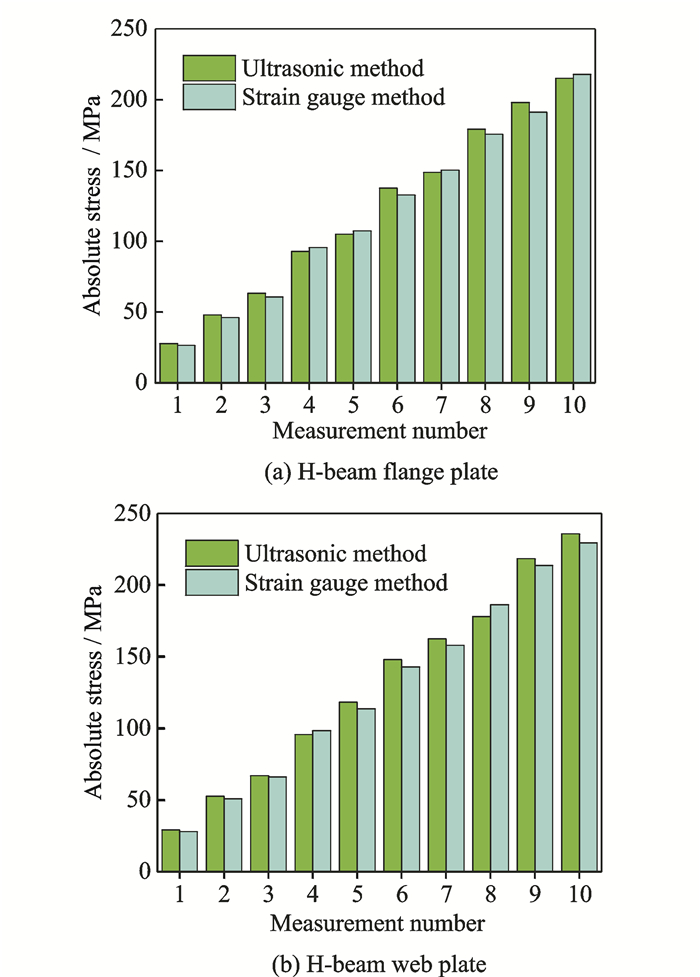
To verify the stress measured by the proposed method, traditional strain gauge method was employed to verify the measured absolute stress values. Before the load was applied to sample C, strain gauges were attached on the surface of sample C, as shown in Fig. 7. The stresses of the steel members are calculated based on the product of Young′s modulus and the measured strain, which is listed in Table 1. The results measured by both methods are compared and listed in Fig. 8.
|
Fig. 7 Position of strain gauge for sample C |
|
Fig. 8 Comparison between the ultrasonic method and the strain gauge method of sample C |
4 Results and Discussions
Fig. 6 shows that the inverse of FCF and its corresponding stress in the samples A and B exhibits an almost perfect linear relationship with a fitting error of less than 1%. The fitting results verify the correctness of Eq. (1). The absolute-stress measurement results for sample C and the strain gauge measurement values are listed in Table 1. The results show that the difference between the stresses measured by the two methods is less than 5% for every single test, which demonstrates the reliability and accuracy of the proposed method.
To facilitate validation of the proposed method, the loaded specimen was taken as the test object. In many cases, the structural steel members are mainly subjected to axial force with their both ends fixed. The loading method used in this study can ensure that the samples is under uniaxial stress condition.
It should be pointed out that there are some characteristics of proposed method. First, this method focuses on the change of the FCF in amplitude spectrum and the variation of ultrasound TOF is not taken into account. Second, the whole process of measurement is non-destructive. Third, the measurement system is consisted of portable equipment, and the equipment is low cost. All these advantages make it convenient for field stress evaluation, from pre-operation stage to the service operation.
5 ConclusionsThis paper confirms the potential of the ultrasonic shear-wave spectroscopy method in measurement of the absolute stress of steel members. The relationship between the stress and the FCF in shear-wave echo amplitude spectrum is studied by two steel members. The absolute stresses of H-beam loaded by the universal testing machine are evaluated by the proposed method and verified by the strain gauge method. According to the achieved results, the conclusions are summarized as follows:
(1) Absolute stress causes the amplitude spectrum to change. When steel member stresses increase, the change in the amplitude-spectrum value corresponding to the FCF is increasingly obvious.
(2) The FCF values decrease with stress. The inverse of FCF and its corresponding stress exhibits an almost perfect linear relationship.
(3) The calibration of the parameters should be implemented on replication member with same thickness and materials to the tested object.
(4) The ultrasonic shear-wave spectroscopy method has logically evaluated the stress quantity of the loaded H-beam. Its validity is confirmed with the strain gauge method.
Acknowledgements
This study is financially supported by the National Key Research and Development Program of China (No.2016YFC0701102); the National Nature Science Foundation of China (No.51538003); and the Shenzhen Technology Innovation Program (No.JSGG20150330103937411).
| [1] |
LI J, HAO H, FAN K Q. Development and application of a relative displacement sensor for structural health monitoring of composite bridges[J]. Structural Control & Health Monitoring, 2015, 22(4): 726-742. |
| [2] |
ROSSINI N S, DASSISTI M, BENYOUNIS K Y. Methods of measuring residual stresses in components[J]. Materials & Design, 2012, 35: 572-588. |
| [3] |
CRECRAFT D I. Measurement of applied and residual stresses in metals using ultrasonic waves[J]. Journal of Sound and Vibration, 1967, 5(1): 173. DOI:10.1016/0022-460X(67)90186-1 |
| [4] |
LI Z H, HE J B, TENG J. Internal stress monitoring of in-service structural steel members with ultrasonic method[J]. Materials, 2016, 9(4): 223-192. DOI:10.3390/ma9040223 |
| [5] |
WITHERS P J, TURSKI M, EDWARDS L. Recent advances in residual stress measurement[J]. International Journal of Pressure Vessels and Piping, 2008, 85(3): 118-127. DOI:10.1016/j.ijpvp.2007.10.007 |
| [6] |
CHAKI S, KE W, DEMOUVEAU H. Numerical and experimental analysis of the critically refracted longitudinal beam[J]. Ultrasonics, 2013, 53(1): 65-69. DOI:10.1016/j.ultras.2012.03.014 |
| [7] |
JAVADI Y, PIRZAMAN H S, RAEISI M H. Ultrasonic inspection of a welded stainless steel pipe to evaluate residual stresses through thickness[J]. Materials & Design, 2013, 49: 591-601. |
| [8] |
JAVADI Y, AKHLAGHI M, NAJAFABADI M A. Using finite element and ultrasonic method to evaluate welding longitudinal residual stress through the thickness in austenitic stainless steel plates[J]. Materials & Design, 2013, 45: 628-642. |
| [9] |
EGLE D M, BRAY D E. Measurement of acoustoelastic and 3rd-order elastic-constants for rail steel[J]. Journal of the Acoustical Society of America, 1976, 60(3): 741-744. DOI:10.1121/1.381146 |
| [10] |
BRAY D E, JUNGHANS P. Application of the L(cr) ultrasonic technique for evaluation of post-weld heat-treatment in steel plates[J]. NDT & E International, 1995, 28(4): 235-242. |
| [11] |
SANTOS A A D, BRAY D E. Comparison of acoustoelastic methods to evaluate stresses in steel plates and bars[J]. Journal of Pressure Vessel Technology-transactions of the ASME, 2002, 124(3): 354-358. DOI:10.1115/1.1484114 |
| [12] |
JAVADI Y, AZARI K, GHALEHBANDI S M. Comparison between using longitudinal and shear waves in ultrasonic stress measurement to investigate the effect of post-weld heat-treatment on welding residual stresses[J]. Research in Nondestructive Evaluation, 2017, 28(2): 101-122. DOI:10.1080/09349847.2015.1123786 |
| [13] |
PALANICHAMY P, VASUDEVAN M, JAYAKUMAR T. Measurement of residual stresses in austenitic stainless steel weld joints using ultrasonic technique[J]. Science and Technology of Welding and Joining, 2009, 14(2): 166-171. DOI:10.1179/136217108X394753 |
| [14] |
JHANG K Y, QUAN H H, HA J. Estimation of clamping force in high-tension bolts through ultrasonic velocity measurement[J]. Ultrasonics, 2006, 441: E1339-E1342. |
| [15] |
PALANICHAMY P, JOSEPH A, JAYAKUMAR T. Ultrasonic velocity-measurements for estimation of grain-size in austenitic stainless-steel[J]. NDT & E International, 1995, 28(3): 179-185. |
| [16] |
JAVADI Y, AKHLAGHI M, NAJAFABADI M A. Nondestructive evaluation of welding residual stresses in austenitic stainless steel plates[J]. Research in Nondestructive Evaluation, 2014, 25(1): 30-43. DOI:10.1080/09349847.2013.822134 |
| [17] |
LHéMERY A, CALMON P, CHATILLON S. Modeling of ultrasonic fields radiated by contact transducer in a component of irregular surface[J]. Ultrasonics, 2002, 40(1-8): 231-236. DOI:10.1016/S0041-624X(02)00143-9 |
| [18] |
LIPELES R, KIVELSON D. Theory of ultrasonically induced birefringence[J]. Journal of Chemical Physics, 1977, 67(10): 4564-4570. DOI:10.1063/1.434598 |
| [19] |
BLINKA J, SACHSE W. Application of ultrasonic-pulse-spectroscopy measurements to experimental stress analysis[J]. Experimental Mechanics, 1976, 16(12): 448-453. DOI:10.1007/BF02324101 |
| [20] |
SONG W T, XU C G, PAN Q X. Nondestructive testing and characterization of residual stress field using an ultrasonic method[J]. Chinese Journal of Mechanical Engineering, 2016, 29(2): 365-371. DOI:10.3901/CJME.2015.1023.126 |
| [21] |
HASEGAWA M, SASAKI Y. Acoustoelastic birefringence effect in wood. I. Effect of applied stresses on the velocities of ultrasonic shear waves propagating transversely to the stress direction[J]. Journal of Wood Science, 2004, 50(1): 47-52. DOI:10.1007/s10086-003-0536-8 |
 2018, Vol. 35


