Planar linkage mechanisms are widely used in machines to ensure their functions. Some motion errors in these machines are inevitable due to tolerance, defects arising from the design and manufacturing process or wearing after a certain working period. Thus, because of these uncertainness factors, the motion error of the mechanism cannot be effective predicted in the design phase. In the past, the research on the motion error prediction in the presence of uncertainty factors generally can be divided into two kinds of methods.
The first is research on link dimensional errors. Link dimensional error is considered in the design phase, so the motion error of the actual mechanism can be reduced. Dong et al. [1-2] have presented fuzzy rel iability analysis of slider-crank mechanism, so a method of fuzzy reliability design was got. However, it is not enough just to precisely predict the motion error of the post- manufacturing's mechanism.
Moreover, joint clearance has been taken into consideration. Lee and Gilmore[3] have presented the joint clearance bar model, and the joint clearance was treated as a massless virtual link with the length equaling to one-half of the clearance. Song et al. [4] ha ve presented the calculation method of the joint clearance bar dimension distribution. Tan et al. [5] have presented an effective model to analyze the offset slider-crank mechanism with joint clearance, and then based on robustn ess design, the optimal design method was got. Luo and Du[6-9] have presented the modified first order second moment based on the first order second moment and the Monte Carlo simulation method, and used a four-bar mechanism and a slider-crank mechanism to test the proposed method. Aiming at the four-bar mechanism, Gogate et al. [10] got three different objective functiions. The reliable foundation for the establishment of the model was provided. Zhu and Ting[11-12] have presented a general approach for the kinematics of four-bar mechanism with joint clearances by using the assumption of continuous contact model. However, a single DOF four-bar linkage would become a five DOF eight-bar linkage and it will inevitably cause th e whole model solves tedious. Thus, Guo et al. [13-14] have prese nted an "effective length model" to replace the "joint clearance bar model", and rerified the precision of the model by an offset slider-crank mechanism example.
In this paper, based on the Monte Carlo simulation method, considering the requirement of motion precision and the fit between hole and shaft, the distribution range of any joint clearances bar size can be calculated. Combined with the dimensional tolerance of the component for parameter optimization, compared with the mean and standard deviations of the motion error, a set of quantitative evaluation system for mechanism optimization design is provided. At the end of this paper, a basic thought of balancing the motion precision and manufacturing cost is presented.
1 Multi-objective Optimal Design Model of Planar Linkage Mechanism for ManufacturingActual motion error of the mechanism can be described as
| $ \Delta = {y_{{\rm{am}}}} - {y_{{\rm{rm}}}} $ | (1) |
where yrm and yam denote the required motion output and actual motion output, respectively.
Currently, practical mechanism most adopted a serial mode of design to manufacturing. The complexity of the manufacturing process and the relationship between design and manufacturing lead to some inevitable and uncertain factors in practical mechanism, which increases the uncertainty of the whole motion error[6-12]. Thus, the motion error of the actual mechanism is
| $ \begin{array}{*{20}{c}} {\Delta \left( {\mathit{\boldsymbol{X}},\mathit{\boldsymbol{Z}}} \right) = {{y'}_{{\rm{am}}}}\left( {\mathit{\boldsymbol{X}},\mathit{\boldsymbol{Z}}} \right) - {y_{{\rm{rm}}}}}\\ {\mathit{\boldsymbol{X}} = {x_1},{x_2}, \cdots ,{x_p};\;\;\;\;\mathit{\boldsymbol{Z}} = {x_1},{x_2}, \cdots ,{x_q}} \end{array} $ | (2) |
where X denotes a collection of control factors for the mechanism, Z a collection of noise factors for the mechanism, p the number of control factors, and q the number of noise factors. y′am(X, Z) the actual motion of the mechanism, in which noise factors and other objective factors are considered. Noise factors include environmental factors change, manufacturing parameter change, material aging, abrasion, and processing method change etc.
Optimization of the usual mechanism is trajectory optimization, namely, there are many discrete points in the trajectory and existence multiple point motion errors, so the mechanism's motion error δ can be expressed as
| $ \delta = \sqrt {\frac{1}{s} \cdot \sum\limits_{n = 1}^s {{{\left( {{{y'}_{{\rm{am}}}}\left( {\mathit{\boldsymbol{X}},\mathit{\boldsymbol{Z}}} \right) - {y_{{\rm{rm}}}}} \right)}^2}} } $ | (3) |
where s is the number of discrete points.
Therefore, the objective function of the optimal design model of the planar linkage mechanism for the manufacturing is
| $ \min F\left( {\mathit{\boldsymbol{X}},\mathit{\boldsymbol{Z}}} \right) = {\omega _1}{\mu _\delta } + {\omega _2}{\sigma _\delta } $ | (4) |
where μδ is the mean value of the error δ, and σδ the standard deviation. ω1, ω2 are the weight coefficients for mean and standard deviation, respectively[15].
According to different application conditions and the role of the forms diversity caused by these different application conditions, there is a certain relationship between the link of mechanism fi (such as rotation characteristics of the whole cycle, the crank existence conditions and the characteristics of minimum transmission angle), and fti is difined as the characteristics requirements of the mechanism in Eq.(5).
| $ \begin{array}{*{20}{c}} {{f_i}\left( {\mathit{\boldsymbol{X}},\mathit{\boldsymbol{Z}}} \right) - {f_{ti}} \le 0}\\ {\mathit{\boldsymbol{X}} = {x_1},{x_2}, \cdots ,{x_p};\mathit{\boldsymbol{Z}} = {x_1},{x_2}, \cdots ,{x_q};i = 1,2, \cdots ,n} \end{array} $ | (5) |
where n is the number of requirements for the mechanism's characteristics.
Other objective factors, such as precision, cost, stability, and dynamic mechanical behavior etc. can furthermore add to a number of corresponding constraints. To filter the data from design result, these constraints are specified in Eq.(6).
| $ \begin{array}{*{20}{c}} {{g_j}\left( {\mathit{\boldsymbol{X}},\mathit{\boldsymbol{Z}}} \right) - {g_{tj}} \le 0}\\ {\mathit{\boldsymbol{X}} = {x_1},{x_2}, \cdots ,{x_p};\mathit{\boldsymbol{Z}} = {x_1},{x_2}, \cdots ,{x_q};j = 1,2, \cdots ,m} \end{array} $ | (6) |
where gtj are the constraints value on other objective factors (determined by objective requirements), and m the number of other objective factor constraints.
Finally, an optimal design model of the planar linkage mechanism for manufacturing can be expressed as
| $ \min F\left( {\mathit{\boldsymbol{X}},\mathit{\boldsymbol{Z}}} \right) = {\omega _1}{\mu _\delta } + {\omega _2}{\sigma _\delta } $ |
| $ {\rm{St}}{\rm{.}}\;\;\;{f_i}\left( {\mathit{\boldsymbol{X}},\mathit{\boldsymbol{Z}}} \right) - {f_{ti}} \le 0\;\;\;i = 1,2, \cdots ,n $ |
| $ {g_j}\left( {\mathit{\boldsymbol{X}},\mathit{\boldsymbol{Z}}} \right) - {g_{tj}} \le 0\;\;\;\;j = 1,2, \cdots ,m $ |
| $ \mathit{\boldsymbol{X}} = {x_1},{x_2}, \cdots ,{x_p},\mathit{\boldsymbol{X}} \in {\left( {{\mathit{\boldsymbol{X}}^{\rm{L}}},{\mathit{\boldsymbol{X}}^{\rm{U}}}} \right)^{\rm{T}}} $ |
| $ \mathit{\boldsymbol{Z}} = {z_1},{z_2}, \cdots ,{z_q},\mathit{\boldsymbol{Z}} \in {\left( {{\mathit{\boldsymbol{Z}}^{\rm{L}}},{\mathit{\boldsymbol{Z}}^{\rm{U}}}} \right)^{\rm{T}}} $ |
where XL and XU are collections of control factors' lower and upper bound value, respectively (determined by initial conditions). ZL and ZU are collections of noise factors' lower and upper bound value, respectively(jointly determined by design and processing requirements).
2 Modeling of Planar Four-bar Linkage with Joint Clearance and Case AnalysisFor planar four-bar mechanism, it is well known that the mechanism performance measure is usually referred to as the ability of reaching the desired position or orientation precisely. Link dimensional tolerances and fit tolerances make the performance of mechanisms worse [11-14]. The collection of control factors includes the length and its range, rotation angle and so on. The collection of noise factors includes fit tolerance and dimensional tolerance, geometric tolerance, roughness, and the deviation between holes etc. The randomness of the tolerance distribution leads to the randomness of the motion error. The correlation between tolerance distribution and the model pose can be obtained based on Monte Carlo simulation method, then the mathematical model of optimal design is set up. The offset slider-crank mechanism is used as an illustrative example.
2.1 Pose description of the model of planar four-bar linkage with joint clearanceThe four-bar mechanism is widely used in planar linkage mechanism[16]. According to Lee's "joint clearance bar model" [3], the hole-shaft structure is assumed for each link, namely, the point A of the frame is the hole, the point A of the crank is the shaft, the point B of the crank is the hole, and the point B of the link is the shaft. The specific pose description of mechanism with joint clearance bar is shown in Fig. 1.
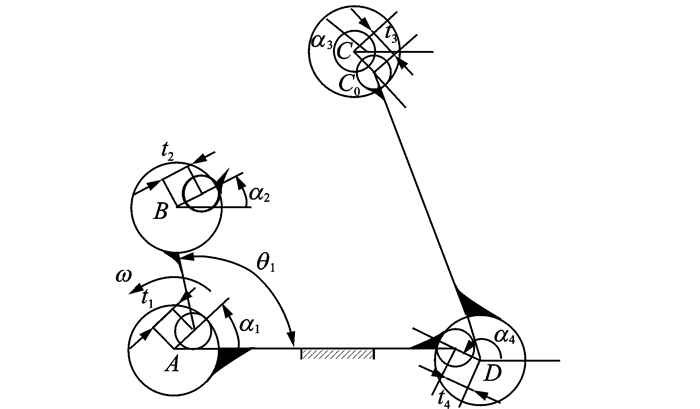
|
Fig. 1 Pose description withjoint clearance bar |
Replacing the revolute pair with joint clearance bar that forms a model of an eight-bar linkage mechanism, causing the whole model solves complex. According to Ref.[13], an effective length model was adopted (as shown in Fig. 2, the link CD in Fig. 1 is used to describe), where C0D+DD0 is replaced with C0D, that is, replacing the effective length with the sum of joint clearance and the original bar. Finally, a four-bar model with the effective length is generated.

|
Fig. 2 Effective length model |
By analysing the relationship between C0D and C0D0, the vector equation can be expressed as
| $ {C_0}{D_0}{{\rm{e}}^{{\rm{i}}{\mathit{\Phi }_1}}} = {C_0}D{{\rm{e}}^{{\rm{i}}\mathit{\Phi }}} + {t_4}{{\rm{e}}^{ - {\rm{i}}{\alpha _4}}} $ | (7) |
where C0D is the length of the original bar, t4 the length of joint clearance bar of revolute pair D, α4 the azimuth of joint clearance bar, and C0D0 the length of the effective bar.
The geometric relation can be expressed as
| $ {C_0}{D_0}\left[ {\begin{array}{*{20}{c}} {\sin {\mathit{\Phi }_1}}\\ {\cos {\mathit{\Phi }_1}} \end{array}} \right] = {C_0}D\left[ {\begin{array}{*{20}{c}} {\sin \mathit{\Phi }}\\ {\cos \mathit{\Phi }} \end{array}} \right] + {t_4}\left[ {\begin{array}{*{20}{c}} { - \sin {\alpha _4}}\\ {\cos {\alpha _4}} \end{array}} \right] $ | (8) |
Because
Taking the sum of squares of Eq.(8), it can be expressed as
| $ {C_0}{D_0} = {C_0}D\sqrt {1 + 2\frac{{{t_4}}}{{{C_0}D}}\cos \left( {\mathit{\Phi } + {\alpha _4}} \right)} $ | (9) |
Because
| $ {C_0}{D_0} = {C_0}D + {t_4}\cos \left( {\mathit{\Phi } + {\alpha _4}} \right) $ | (10) |
Namely, by Eq.(10), the replacement of eight bar mechanism to four bar mechanism is realized, and a mathematical model of planar four-bar mechanism with joint clearance is established.
2.2 Multi-objective optimal design model analysis and simulation based on Monte Carlo simulation methodIn the components mass production, all the link dimension tolerances follow a normal distribution, while the azimuth of joint clearance bar follows a uniform distribution[11-12], predicting the difficulty of the probability distribution model of the whole motion error. The Monte Carlo simulation method is applied in probability analysis of the multivariate random function, and it is commonly used in tolerance analysis[17-18]. In this paper, using this method, the optimal design of planar four-bar mechanism with joint clearance for manufacturing is presented.
2.2.1 Simulation on the length of joint clearance bar by Monte Carlo simulation methodAccording to the design requirements, after manufacturing, the joint clearance bar naturally forms. The dimension of length tk (including t1, t2, t3 and t4) can be expressed as
| $ {t_k} = \frac{1}{2}\left( {{d_{{\rm{h}}k}} - {d_{{\rm{s}}k}}} \right) $ | (11) |
Supposing that the inner diameter of the hole is expressed as
The manufacturing dimension error follows a normal distribution. According to normal distribution sampling formula, Eq.(12) can be obtained
| $ {d_{vk}} = {{\bar d}_{vk}} + {\sigma _{vk}}\sqrt { - 2\ln a} \left[ {\begin{array}{*{20}{c}} {\cos \left( {2{\rm{ \mathsf{ π} }}b} \right)}\\ {\sin \left( {2{\rm{ \mathsf{ π} }}b} \right)} \end{array}} \right] $ | (12) |
where
Based on Monte Carlo simulation method, sampling is carried out according to Eq. (12), in which the sample value of the hole dhk and the shaft dsk are represented as row vectors dhk1, dhk2, dhk3, …, dhkN and dsk1, dsk2, dsk3, …, dskN (N denoting the sample size). According to mathematical statistics method, due to Eq.(11), some further processing is done to the obtained samples. Then the mean value
Based on Monte Carlo simulation method, according to the range of control factors and the distribution of noise factors, the sample can be extracted and calculated[17-19] (sample size N=106). The description of the mean value and standard deviation of motion error in Eq.(3) can be got. Combined with constraints of the mechanism's characteristics, through the optimization algorithm (The penalty function method is used in this paper) to solve, an optimum solution can be got. The optimal design process of planar four-bar mechanism with joint clearance is shown in Fig. 3.
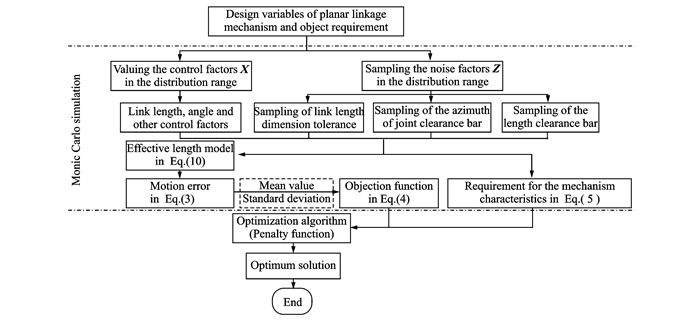
|
Fig. 3 Flow chart of optimal design for planar four-bar mechanism with joint clearance |
2.3 Optimal design example analyses of offset slider-crank mechanism with joint clearance
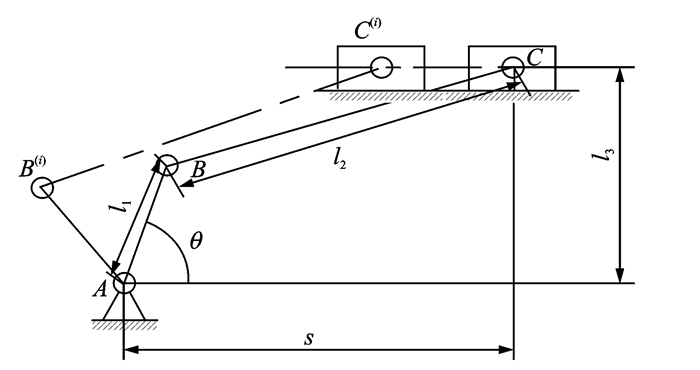
Offset slider-crank mechanism is shown in Fig. 4. For convenient comparison with Ref.[13], the working range of crank is [225°, 285°], and the corresponding working range of slider is [80 mm, 120 mm]. The relation between the slider displacement s0 and the crank angle θ can be described in Eq.(13), which is the required motion output yrm in Eq.(3).
| $ {s_0} = 80 + 40 \times {\left( {\frac{{\theta - 225}}{{60}}} \right)^2} $ | (13) |
|
Fig. 4 Offset slider-crank mechanism |
Actual motion displacement of the slider can be calculated by Eq.(14), which denotes actual motion output y′am in Eq.(3).
| $ s = {l_1}\cos \theta + \sqrt {l_2^2 - {{\left( {{l_3} - {l_1}\sin \theta } \right)}^2}} $ | (14) |
Thirteen points θi in the angle range [225°, 285°] of the crank can be got, in which i=1, 2, …, 13. Therefore, considering the link dimensional tolerance and the revolute pair fit tolerance at the same time, the motion displacement error of the slider can be expressed as
| $ \delta = \sqrt {\frac{1}{{13}} \cdot \sum\limits_{i = 1}^{13} {{{\left( {{s_0}\left( {{\theta _i}} \right) - s\left( {{l_1},{l_2},{l_3},{\theta _i},\Delta {l_1},\Delta {l_2},\Delta {l_3},{t_1},{t_2},{t_3},{\alpha _1},{\alpha _2},{\alpha _3}} \right)} \right)}^2}} } $ | (15) |
where
In Ref.[16], supposing that the basic dimension of the inner diameter of the hole and the outer diameter of the shaft range from (10 mm, 18 mm], according to the fit characteristics and application conditions, three fit clearances of
|
Table 1 Mean value |
Control factors and noise factors are given in Table 2. Through the principle of 3σ[11-12], the standard deviation of the crank, link, and offset distance can be obtained.
| Table 2 The distributed parameter of control factors and noise factors |
The optimal design model of slider-crank mechanism with joint clearance can be expressed as
| $ \begin{array}{*{20}{c}} {\min F\left( {\mathit{\boldsymbol{X}} = \mathit{\boldsymbol{X}},\mathit{\boldsymbol{Z}}} \right) = {\omega _1}{\mu _\delta } + {\omega _2}{\sigma _\delta }}\\ {{\rm{s}}.{\rm{t}}.\;\;{l_1} + {t_1} - {l_2} - {t_2} + {l_3} + {t_3} \le 0} \end{array} $ | (16) |
| $ {\mathit{\boldsymbol{X}}^{\rm{L}}} = {\left( {50,160,65} \right)^{\rm{T}}} $ |
| $ {\mathit{\boldsymbol{X}}^{\rm{U}}} = {\left( {60,170,75} \right)^{\rm{T}}} $ |
| $ {\mathit{\boldsymbol{Z}}^{\rm{L}}} = {\left( {0.001,0.001,0.001} \right)^{\rm{T}}} $ |
| $ {\mathit{\boldsymbol{Z}}^{\rm{U}}} = {\left( {0.15,0.15,0.15} \right)^{\rm{T}}} $ |
| $ {\rm{Initial}}\;{\rm{value}} = {\left( {55,165,70,0.07,0.07,0.07} \right)^{\rm{T}}} $ |
where ω1=1, ω2=1 is obtained[15]. From line position tolerance[16], the range of dimensional tolerances of ΖL and ZU can be confirmed.
2.3.2 Solution and result analysis of mathematical modelBased on typical robustness optimal design, aiming at offset slider-crank mechanism, an optimal design model with joint clearance was established, and the link dimensional tolerance of the mechanism were got[13]. Aiming at the scheme, for contrast in the design effects, the same dimensional and fit tolerance are adopted. The design parameters of Ref.[13] and this paper are given in Table 3.
| Table 3 Comparison results of this paper with robustness design |
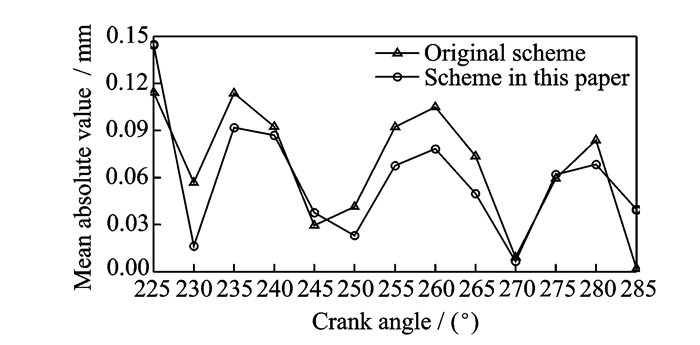
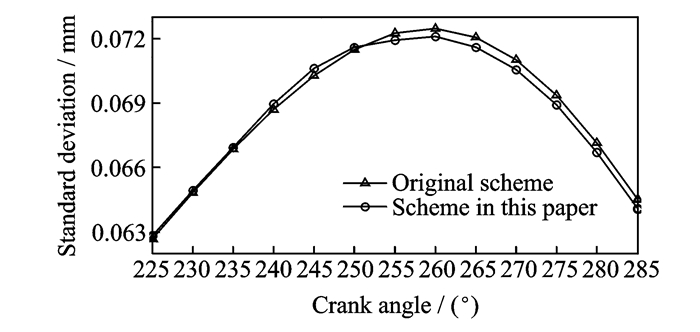
The mean value and standard deviation of the error are important parameters, from which the motion error of the mechanism can be evaluated [6-9, 13-14]. The optimization result is calculated through the design process in Fig. 5, and the mean value and standard deviation of motion error can be obtained, respectively (as shown in Figs. 6, 7).

|
Fig. 5 Calculation flow chart of mean value and standard deviation of motion error with joint clearance |
|
Fig. 6 Mean absolute value of error comparison between original scheme and scheme in this paper |
|
Fig. 7 Standard error deviation comparison between original scheme and scheme in this paper |
As shown in Figs. 6, 7, compared with the result of typical robustness design, the similar variation characteristics of mean value and standard deviation can be found, so the method in this paper is effective.
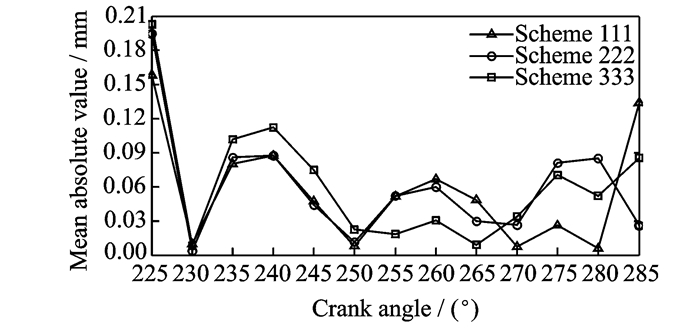
According to the proposed design model the design parameters and the motion error of three schemes (minimum clearance 111, medium clearance 222 and maximum clearance 333) were calculated, through the process in Fig. 3. Results of design parameters for three schemes are given in Table 4, and the mean value and standard deviation of motion error are shown in Figs. 8, 9.
| Table 4 Optimization results of three schemes |
|
Fig. 8 Mean absolute value of error of comparison of three schemes |

|
Fig. 9 Error standard deviation comparison ofthree schemes |
3 Multi-objective Optimal Design for Motion Precision and Cost Saving
In the engineering, the precision requirement is the precondition of the optimal design, and the cost is one of the main factors to be considered in the optimal design of planar linkage mechanism, but the motion precision of the mechanism and the cost of manufacturing cannot be effectively balanced.
In this paper, the optimal solutions are obtained through the process of Fig. 3, which is only the minimum value of the objective function. However, when the uncertainty factors increase, the whole precision of the mechanism will be affected[20-22]. Hence, it is necessary to evaluate the optimal solutions of the system, and a basis for the following cost requirements is provided.
3.1 Model precision and cost evaluationIn general design, the same fit clearance for each joint point is provided. However, in fact, some points have less impact for the motion precision of the mechanism, if smaller clearances are applied to these points, the unnecessary cost will be increased. Thus, in this paper, this unnecessary cost is mainly aimed at to be analyzed.
Assuming that each revolute pair of the slider-crank mechanism has three different clearances to be chosen (as showen in Table 1), that is, 33=27 schemes in total. Each scheme is designed by the process in Fig. 3, and 27 optimum solutions will be obtained, which are evaluated according to the following precision evaluation criteria.
Supposing that the object point is oi, i=1, 2, …, 13, the upper and the lower bound of the object can be expressed as oui=oi+oi·p and oli=oi-oi·p, respectively. p is the object-precision. From Figs.(6, 8) it can be found that the mean value at the point of 225 ° is larger than the other points, hence, 0.2mm is used to define the object- precision, that is, 0.2/80=2.5‰, namely the precision p=2.5‰. In the obtained optimization results,
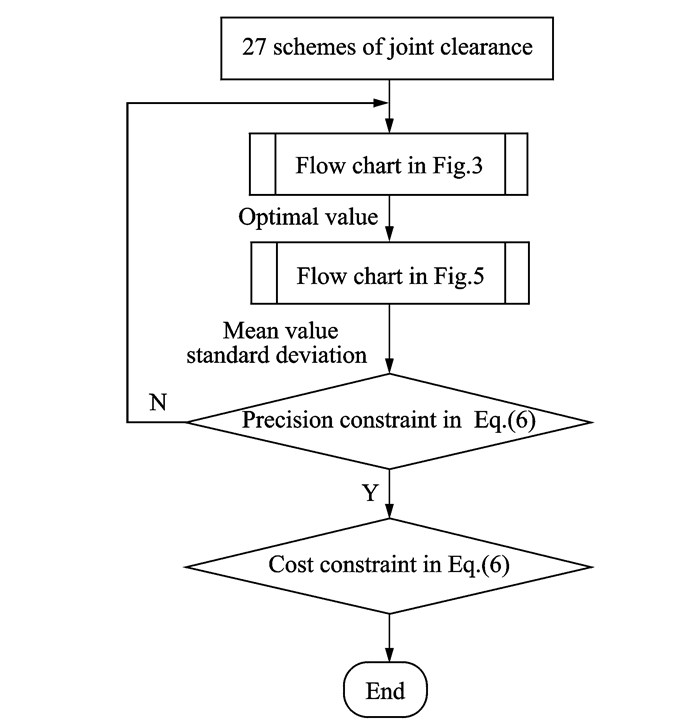
When the optimization results of the schemes fulfill the precision requirements, cost evaluation is then carried out, that is, the biggest sum of the sequence number are chosen (the bigger clearance causes the lower cost). Motion precision and cost evaluation process of the whole mechanism is shown in Fig. 10.
|
Fig. 10 Process analysis of multi-objective optimal design model |
3.2 Multi-objective optimal design process and results
According to the process of multi-objective optimal design model in Fig. 10, the 27 schemes are firstly sampled for calculation in turn. Then the motion precision is evaluated and the schemes that fulfill the precision requirement are chosen, that is, 111, 122, 123, 211, 212, 223, 322 and 332. Finally, the biggest clearance scheme is chosen (the lowest cost), which is 332. Thus, the joint point of the actual mechanism is
In this way, the lowest manufacturing cost under the motion precision premise of this example can be obtained. Considering there are numerous factors affecting the cost, the basic thought of balancing the precision and the cost is provided.
4 Conclusions(1) In view of the uncertain increases in the mechanism's whole motion error after manufacturing, the motion error is predicted to be difficult at the design phase. This paper analyzes the relationship between design and manufacturing. Based on Monte Carlo simulation method, an optimal design model of planar linkage mechanism with joint clearance is presented.
(2) As shown in Figs. 6, 7, compared with the result of typical robustnes s design, the similar variation characteristics of the mean value and the standard deviation can be found, so the method in this paper is effective.
(3) As shown in Figs. 8, 9, with the increase of the joint clearance, the mean value of the motion error fluctuates in a certain range. The standard deviation of the motion error increases, namely, the motion error fluctuation of the actual mechanism increases at the mean value points, so the uncertainty of the mechanism's motion error increases. The model in this paper can be used to quantitatively describe the influence of different fit and dimensional tolerances on the motion error of actual mechanism.
(4) In general, motion precision of the mechanism and the manufacturing cost cannot be effectively balanced. That is, with the decrease of the joint clearance, the motion precision increased, and the manufacturing cost increased. In this paper, aiming at typical offset slider-crank mechanism, three different clearances for each joint point are pr ovided. Applying the proposed model, 27 schemes are calculated, the results are analyzed, and a scheme that meets the requirement of both the precision and the cost can be obtained. Considering there are numerous factors affecting the cost, a basic thought of balancing the precision and the cost is provided.
AcknowledgementsThis work was supported by the National Natural Science Foundation of China (No.51275365) and the National High-tech R&D Program (863 Program) (No.2014AA041504).
| [1] |
DONG Yuge, NI Zheng, ZHAO Xiande. A simple approach of the fuzzy reliability analysis of the slide-crank mechanism movement[J]. Journal of Hefei University of Technology, 2004, 27(11): 1448-1452. (in Chinese) |
| [2] |
DONG Yuge, CHEN Xinzhao, ZHAO Xiande. An application of fuzzy reliability theory in the reliability analysis of the mechanism movement[J]. Journal of Applied Science, 2002, 20(3): 316-320. (in Chinese) |
| [3] |
LEE S J, GILMORE B J. The determination of the probabilistic properties of velocities and acceleration in kinematic chains with uncertainty[J]. Journal of Mechanical Design, 1991, 113(1): 84-90. DOI:10.1115/1.2912755 |
| [4] |
SONG Li, YANG Jian. Effect of dimension type on error transfer coefficient of planar linkage with clearance[J]. Natural Science Journal of Xiangtan University, 1999, 2(3): 64-69. (in Chinese) |
| [5] |
TAN Xiaolan, HAN Jianyou. Robust design of function generating mechanisms considering kinematic pair clearance[J]. Journal of University of Science and Technology Beijing, 2004, 26(4): 416-419. (in Chinese) |
| [6] |
LUO Kang, WANG Jinge, DU Xiaoping. Robust mechanism synthesis with truncated dimension variables and interval clearance variables[J]. Mechanism and Machine Theory, 2012, 57(57): 71-83. |
| [7] |
LUO Kang, DU Xiaoping. Probabilistic mechanism analysis with bounded random dimension variables[J]. Mechanism and Machine Theory, 2013, 60(1): 112-121. |
| [8] |
DU Xiaoping, HU Zhen. First order reliability method with truncated random variables[J]. Journal of Mechanical Design, 2012, 134(9): 255-274. |
| [9] |
HU Zhen, DU Xiaoping. Time-dependent reliability analysis with joint upcrossing rates[J]. Structural & Multidisciplinary Optimization, 2013, 48(5): 893-907. |
| [10] |
GOGATE G R, MATEKAR S B. Optimum synthesis of motion generating four-bar mechanisms using alternate error functions[J]. Mechanism and Machine Theory, 2012, 54(4): 41-61. |
| [11] |
ZHU Jianmin, TING K L. Uncertainty analysis of planar and spatial robots with joint clearances[J]. Mechanism and Machine Theory, 2000, 35(9): 1239-1256. DOI:10.1016/S0094-114X(99)00076-2 |
| [12] |
TING K L, ZHU J M. The effects of joint clearance on position and orientation deviation of linkages and manipulators[J]. Mechanism and Machine Theory, 2000, 35(3): 391-401. DOI:10.1016/S0094-114X(99)00019-1 |
| [13] |
GUO Huixin, YUE Wenhui. Design optimization of planar linkage mechanism with joint clearance for improving robustness of kinematic accuracy[J]. Journal of Mechanical Engineering, 2012(3): 75-81. (in Chinese) |
| [14] |
GUO Huixin. Position robust analysis and design optimization of needle bar mechanism with joint clearance of automatic embroidery machine[J]. Journal of Textile Research, 2011, 32: 131-136. (in Chinese) |
| [15] |
CHEN Lizhou, YU Biqiang. Mechanical optimal design method[M]. Beijing: Metallurgical Industry Press, 2014. (in Chinese)
|
| [16] |
CHEN Daxian. Handbook of mechanical design[M]. Beijing: Chemical Industry Press, 2013. (in Chinese)
|
| [17] |
LV Cheng, LIU Zijian, AI Yandi, et al. Assembly joint surface error modeling and tolerance optimization in the case of coupled tolerance[J]. Journal of Mechanical Engineering, 2015, 18: 108-118. (in Chinese) |
| [18] |
MO Xuhui, ZHAO Yuhang, ZHONG Zhihua, et al. Robustness optimization of ride comfort for vehicle based on 6σ method[J]. Journal of Central South University(Science and Technology), 2012, 11: 4286-4292. (in Chinese) |
| [19] |
YUAN Guixing, WANG Ping. Monte Carlo simulation and its application in tolerance design[J]. Journal of Tianjin University of Science&Technology, 2008(2): 60-64. (in Chinese) |
| [20] |
SUN Zhili, JI Guangzhen, YAN Yutao, et al. Mechanism motion reliability design and analysis technology[M]. Beijing: Nation Defense Industry Press, 2015. (in Chinese)
|
| [21] |
SHIN S, KONGSUWON P, CHO B R. Development of the parametric tolerance modeling and optimization schemes and cost-effective solutions[J]. European Journal of Operational Research, 2010, 207(3): 1728-1741. DOI:10.1016/j.ejor.2010.07.009 |
| [22] |
HUANG Xianzhen, ZHANG Yimin. Robust tolerance design for function generation mechanisms with joint clearances[J]. Mechanism and Machine Theory, 2010, 45(9): 1286-1297. DOI:10.1016/j.mechmachtheory.2010.04.003 |
| [23] |
ZHAO H, XU X. Model of flight technical error in symmetrical plane for performance based navigation[J]. Transactions of Nanjing University of Aeronautics and Astronautics, 2011, 28(3): 246-254. |
| [24] |
YAO Yu, WU Hongtao. Force Jacobian matrix for 3-DOF cable-driven mechanism with rotation in wind tunnel[J]. Journal of Nanjing University of Aeronautics & Astronautic, 2011, 43(1): 75-78. (in Chinese) |
 2018, Vol. 35


